© 2025 |
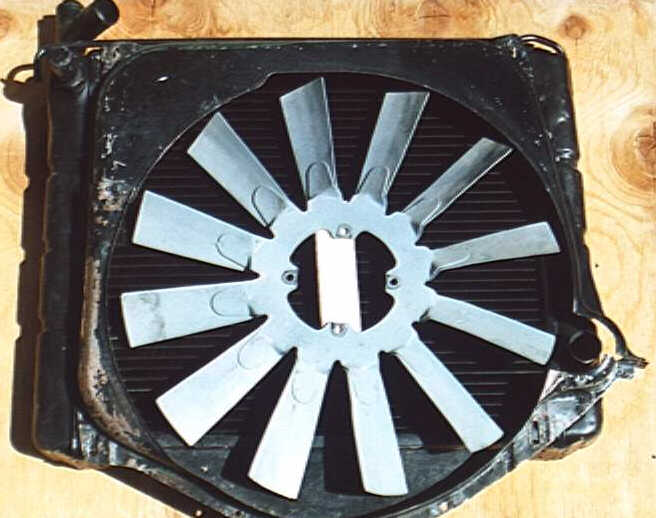
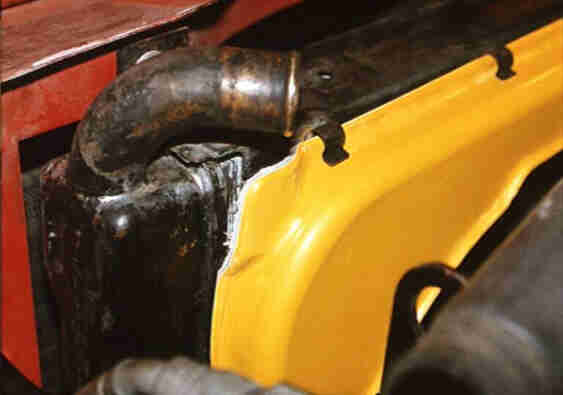
Technical Article: Radiator Cowl SetTriumph Stag Composite Cowl SetABS Thermoformed RADIATOR COWL SET DISCLAIMER:These parts are not made from drawings by Triumph, British Leyland, The Rover Group, BMW, or any other entity. Design and production of these parts is with the intent to improve cooling to the Triumph Stag using new and modern materials. These parts are NOT British Motor Industry Heritage Approved.-------------------------------------------------------------------------------- By: Glenn Merrell -------------------------------------------------------------------------------- PLEASE NOTE:AS OF 11-2005 the "composite" version of the Cowl Set is no longer available.The composite set has been replaced with a NEW and IMPROVED 3/32" thick ABS Plastic Thermo-form set that is much closer to the original metal part.In fact, these are very difficult to distinguish from a cleaned and painted metal cowl set with a casual and close look installed.This new ABS set IS NOW AVAILABLE as of 22 January 2006. Scroll down for photos and status update.IMPORTANT NOTE: UPGRADE -This NEW Cowl set comes to you READY TO FIT. No Drilling, cutting, removing the radiator, trimming, cussing and swearing. All Original Manufacturer type hardware is included, all holes are drilled with spire nuts and screws in place.Additionally, the lower Deflector Shield, PN 313090 is in development to be included with this set or separately to mate up with your existing cowl set.Need a bottom half? I will make bottom halfs to mate up to your existing upper metal half.BackgroundAbout 1996 while reading and discussing the so called cooling problems of the Stag, I decided to begin an investigation into the root cause of the Stag Cooling difficulties. After researching the existing laborious tests by Dave Wardle in the UK of the SOC, considering various other service garage and test opinions and detail examination of numerous engines, I came to the conclusion that the main cause of Stag overheating is lack of proper routine maintenance by the owners or mechanics. Early Stags may have had under rated radiators, maybe some hose and bypass issues. However, many Stags on the road today have had their cooling problems resolved by paying attention to the cooling system maintenance. Two main problem areas were evident:Somewhere along the line Stags received two or three types of fans: a twelve blade 16.5" metal fan, cupped blades; a twelve blade 16.5" Plastic fan, flat blades, and two or three types of intake manifolds. Some other types of the fans may have been fitted in poor judgement by previous owners or mechanics like fans from a TR7 or TR6 which are smaller diameters. Why the fan change out was performed is unknown to me - possibly to reduce damage by the metal blades, but it is clear that a larger blade area will move more air in a rotation than a smaller fan with less blade area. That is a given. The size of the fan and style of the blades will also have a direct relation affecting the amount of air which is drawn through the radiator. This seems to be the prime deficiency of the Stag Tests in 1994 in the testing chamber performed by the Stag Owners Club. No mention is given in the articles as to the type and size of fan used in the tests. The cowl was removed from the export Stags most likely during servicing by the garage mechanic when the motor mounts sagged, causing the 16.5" fan to hit the radiator cowl and make noise. The mechanic either removed the whole cowl or just the bottom half. It is my specualtion that the motor probably later overheated or the motor mounts sagged further and the metal fan cut through the lower hose causing a loss of coolant. Going back to the data from those UK tests, it is stated that the cowl only "marginally" improved cooling. However, there was a small oversight in analyzing the data in the report. A further examination of the data clearly shows that ONLY two configurations had satisfactory "STABILIZED TEMPERATURE AT IDLE" ... the electric fan modification, AND the 5 row core uprated Stag Radiator WITH the COWLS installed. I suspect by the fact that the Stag under test was a UK model, that it may have had the plastic 16.5" flat blade fan. I believe that had the fan been the 16.5" metal fan, a slightly higher cooling effect AT IDLE may have been realized as the metal fan will not deflect its shape. This is speculation of course, but the UK rolling road test also had forced air from an external fan that may have had something to do with the results. I do not recommend the installation of a 5 row core as it restricts air flow across the radiator too much and may not fit properly in front of the fan. Proper recored Stag radiators in the USA are 3 and 4 row cores made by Modine and are available in high efficiency configurations. Thermostat issues:If you visit the Vintage Triumph Register web pages at http://www.vtr.org/maintain/stag-cooling.html has an excellent article by Wil Mayo and Walter Holliday, supplied by Tim Buja. To compound cooling problems, there are different thermostats using a blanking disk (later Mark I and II) and non blanking disks, and then a "fail open" thermostat. Don't expect to maintain engine cooling unless your system is up to par no matter what you bolt on. A clogged system, malfunctioning or incorrect thermostat will also cause overheating. Also the wrong thermostat combination to different manifolds can actually cause your Stag to overheat.Torquatrol Issues:The fan coupling device is called a Torquatrol. Its function is to limit the fan rotation speed to 2500 rpm to reduce noise and keep the fan from bending into the radiator at high rpm. If a torquatrol is loose or skewed on its mounting bush, or the bearing is bad, the fan will wobble causing a vibration that feels like your crankshaft bearings are gone, right around 2000-2500 rpm. Allowed to continue, the bearing will fail allowing the fan will stick itself into your radiator at the most inopportune moment, trashing your radiator and dumping coolant all over the place. Above all, DO NOT USE WD-40 to lubricate your torquatrol. This will wash the grease out of the the sealed bearing and trash your bearing in short time. So, the slogan for this project is:"Keep Your Stag Cool, Install a NEW Composite ABS Thermoformed Cowl Today"The Triumph Stag Radiator Cowl Set, P/N 312298C and 312299C, Originally stamped from 0.060 inch mild Steel sheet, this set was supplied only to Federal Specification and Austrailan Stags sometime during 1973 and forward. There were probably less than 3000 original metal cowl sets made. My first remake of this cowl set was made of Composite polyester and fiberglass polyester resin. Metal stamping and tooling costs were far too high for a small batch run. Now the third generation of this cowl set is here. It is made of 0.09625 inch ABS, thermoformed and trimmed into the size of the old original stamped metal cowl. These uints look so close to the original metal set that most people will not notice a difference (not ever having seen one) - unless your old cowl is rusty and bent up. These new Cowl Sets are shatter resistant and bendable, rust proof, chemical resistant, and best of all, come to you READY TO FIT!! I have fitted the upper (312298C) and lower (312299C) pieces (Repair Operation Manual 05-06) to both a Mark II radiator (PN 403049), and a Mark I radiator (PN 402808). These cowls should also fit PN 403008 / PKC230 radiators, which show having the holes for the spire clips in the corners of the radiator. However, the pictures below show the Stag 16.5" metal fan, PN 218666 as opposed to the 16.5" plastic fans PN 312302 or 313356 (Repair Operations Manual 02-25, 26, 27) that use different Torquatrols. I have pictures of the new Cowl below, and have retained the photos of the yellow composite cowl that show the clearance of the smaller fan to the cowl in the car. Expect that the best cooling is going to be with the metal 16.5" fan and the cowl, as the 14.5" plastic fan will loose some of its pulling ability between open space of the fan tips and the cowl. The Original Stag Cowls were stamped 0.060 inch metal, shown here with the 16.5" 12 blade metal fan. (This metal cowl set is shown for reference only and is NOT being sold). (original metal cowl set courtesy of Tim Buja)
The NEW Composite ABS Cowl Set, shown Below ...
Cowl Kit contents:This new ABS set comes to you in Black, READY TO INSTALL on a later style Radiator PN 403049. No hole drilling, no trimming. Just make sure your radiator has the holes for spire nuts on the metal top and bottom lips of the radiator. Detailed Step-By-Step Instructions with color pictures; The ABS Cowl set comes READY TO FIT. INSTALLATION:The cowl set will come to you with READY TO FIT a standard PN 403049 "Mark II" radiator. Fitting to a Mark II Radiator is the same procedure as the Mark I, excepting installation of the captive nuts is necessary on the PN 402808 Radiator (Mark I). This is because Mark II radiators have the holes stamped into the top and bottom metal for the spire nuts. By the way, now would be a good time to have your radiator rodded out or recored, AND change your motor mounts!. Mark I Style Radiator fitting - Mark II can ignore removing your radiator and drilling the 4 spire nut tab holes: (pictures will accompany the cowl upon delivery) 1. Being careful not to damage any fins or core tubes in the radiator, remove radiator and hoses, place engine side of the radiator up on a flat surface; 2. Position the upper and lower cowl onto the radiator. Align the top cowl top edge with the top rail of the radiator. Take note the positions on the radiator where the raised corner and hole on the cowl makes room for the spire nut. NOTE: There are hose retaining clips on some Mark I radiators along this top edge, used to hold the radiator overflow hose in place as it travels to the overflow bottle. You will either need to bend these out of the way, or have your radiator specialist remove them and reattached to the cowl with short screws.
Showing radiator overflow clips on a MK I Radiator 3. Remove the cowl and press spire nuts, one each onto the corners of the radiator positions noted in step #2. 4. Place the top cowl back onto the radiator, carefully aligning the top edge of the cowl with the top edge of the radiator, and the "engine side" left edge with the left hand radiator tank edge. The cowl edge and radiator tank edge should be flush for the length of the cowl, as with the top edge of the cowl to the top edge of the radiator. 5. Place the lower cowl half onto the radiator, supporting the bottom edge on a wood block or spacer. Align the lower cowl to overlap the upper cowl on the radiator left side. The Right side should now surround the lower hose connection on the radiator with room for the hose and clamp. NOTE: Some radiator bottom edge metal may be bent from collision or rebuilding. If the edge of the lower cowl meeting the bottom of the radiator needs trimming, trim the mating cowl edge finger guard meeting the radiator to a proper fit with a standard metal shear. 6. Mark the radiator metal tabs for drilling at the spire nut locations ( same spire nuts locations for Mark II). 7. BEING CAREFUL NOT TO DRILL THROUGH ANY CORE TUBES UNDER THE TABS, CAREFULLY Drill a 5/16" hole in each radiator tab at the marked position, recheck alignment with the spire nut centers. You may need to elongate the holes vertically to get a proper fit and allow adjustment of the cowl up or down for proper fitting around the metal or plastic 16.5" fans. 8. Each corner receives two washers; one between the nut and cowl, one between the cowl and bolt. Loosely fit the Screw/washer/cowl/washer to the captive nuts. Top cowl first, then lower cowl. 9. If you have removed your fan, place the fan in the center of the cowl as the above pictures show, to make sure you have enough room all around the fan. Final adjustment will be performed on the car, radiator and fan in place. 10. Press a spire nut onto the upper cowl left junction (picture added here). Mark the position for the spire nut hole, remove spirenut and drill a 5/16" hole in the metal tab. 11. Mark the overlap for drilling (picture added here) and drill a 5/16" hole. This hole may need to be slotted vertically to allow some adjustment of the cowl. 12. Align and mark the upper/lower cowls junction at the lower radiator hose, place a spire nut on the lower cowl junction, mark the spirenut hole position. install the screw into the sprie nut. 13. Remove the speed nut and drill a 5/16" hole. recheck the fit. 14. Remove the cowl from the radiator. 15. Reinstall the radiator and Fan into the car, install all hoses and hose clamps. Make sure the lower hose clamp adjusting bolt does not interfere with fitting the cowl, or the fan. Fill the system with proper coolant 16. Position the upper cowl onto the radiator, loosely fit the screw/washer/cowl/washer sequence to the radiator. 17. From the underside of the car, place the lower cowl into position, overlapping the upper cowl on the left, loosely attach the screw/washer/cowl/washer sequence to the radiator. 18. Place a screw/washer combination into the left side of the cowl halves. 19. Place a screw/washer combination to join the cowl upper/lower halves at the hose connection. Give the fan a spin to check for clearance. Adjust as necessary using the slots in the cowl. 20. Final Check for proper fitting, tighten the cowl top bolts, then the lower cowl bolts, followed by the mating connection at the lower hose, finally the left cowl overlap. THE COST:Each cowl set priced at $230 USD delivered in the USA. Have you checked on EBAY lately? Metal Cowl sets sell consistantly for well over $300-$400 and rising, and you still have to strip it, hammer it, and paint it. Here is the breakdown:Cowl set with hardware ... $220.00 US (bottom half only: $110.00) SUB-TOTAL..................$230.00 US Dollars ADD Additional cost for PAYPAL ($11.00), INTERNATIONAL SHIPPING via US GLOBAL PRIORITY mail, Costs about $50.00, plus about $10.00 for insurance.Standard color is Black, just like the Original Equipment part. This part will not rust nor ever need painting. ORDERING:North America: PREPAYMENT in the form of Cash, Money Order, Personal Check drawn on a US bank only, PayPal to gamerrell@qwest.net and ADD $11.00 to the TOTAL to cover the fees, expect only 2-3 weeks delivery, that is 2-3 weeks after payment is received and your check has cleared. With your paid order you will receive full instructions with color pictures. Worldwide: PREPAYMENT You may pay with PayPal using your charge card to gamerrell@qwest.net, ADD $11.00 to cover the fees. PayPal does however require that you become a PayPal member first. I can help you with this task, and it takes about a week to get approved in Europe due to security reasons. With your paid order you will receive full instructions with color pictures. Print this form out and send it off with payment to: Glenn Merrell ____________________________________________________ ____________________________________________________ ____________________________________________________ ____________________________________________________ _____________________________________________________ _____________________________________________________ -------------------------------------------------------------------------------- Now your Stag will be complete and just a bit cooler that the other Stags on the road.If you are interested in purchasing a composite cowl set for your Stag, you will need to notify me by sending full payment in writing. NO UNPAID "I PROMISE THE CHECK IS IN THE MAIL" orders will be placed. -------------------------------------------------------------------------------- Thanks for stopping by and looking. This page has been accessed thousands of times. Maybe it is time to stop looking now and buy one. Come on, you gotta have one. These things work! Page created by: Glenn Merrell, TWO '73 Stag Federal Spec Stags, one's is green with a 225 BHP FI Rover, one's is mimosa restored original. Changes last made on: 11 November 2004 Posted on Saturday, December 03 @ 13:10:44 |
6/7/2025        | ||||||